
(I’m running Kubuntu 24.04 with Plasma 5.27.12 and X11.)
Here’s the situation. I’ve been told by my university administration that, within the next year, if I’m using a presentation (e.g., LibreOffice Impress) in my classes, I will have to have a voice-to-text option showing what I say as I talk to comply with federal requirements. Microsoft’s PowerPoint has that built in. LibreOffice, as far as I’m aware, does not have that as an option. Neither does Linux.
What the Ask LibreOffice forums recommend is using the OS (Windows or Mac) accessibility options to convert speech to text. In other words, not helpful for someone running Linux.
In true Linux fashion, I’m not going to switch from Linux. I love Linux. It does exactly what I want, when I want, and how I want.
So, what to do?
Well, there are a few options. I tried several. And found one that works pretty well: Vosk with a Python-based overlay.
Punctuation is shit (for now). But it is real-time transcription, which is what I need.
Also, I’m not a programmer. I’m a college professor who knows just enough programming to be dangerous. And I relied very heavily on ChatGPT to do the vibe coding for this solution. It works, but it’s possible a real programmer would have lots of suggestions for how to improve this.
Here’s how I got this working.
Open up a Konsole. You’ll be doing most of this inside a Konsole. First, you need to install the following:
sudo apt install -y python3-venv python3-tk portaudio19-devThe important package there is python3-venv. That allows for virtual environments (venv) on Kubuntu. Once that’s installed, we’re going to create a virtual environment for running the primary software:
python3 -m venv ~/.venvs/vosk-overlayThis is going to create a virtual environment inside my home folder (~/) inside a hidden folder (.venvs) named “vosk-overlay”. We’re then going to move inside that environment to install the software we need:
source ~/.venvs/vosk-overlay/bin/activateThat activates the virtual environment and moves us to it in the Konsole. Now, we install the packages that do the actual work:
pip install --upgrade pippip install vosk sounddevice numpyThat may take a minute. Next, we need to download the vosk models that will perform the transcription:
cd .. ~/.venvs/vosk-overlaymkdir -p /vosk-modelscd /vosk-modelswget https://alphacephei.com/vosk/models/vosk-model-small-en-us-0.15.zipNote, there are other models available. I went with the most lightweight one just to make sure it would work on my somewhat underpowered laptop. You can find all of the available models here.
Next, unzip the model you just downloaded:
unzip vosk-model-small-en-us-0.15.zipThat will unzip the model into a new folder.
You should now have all the necessary packages and models installed. But you still need the overlay that utilizes all of this software. Enter ChatGPT and a bit of vibe coding to make the following Python script. When run, this will create an overlay on your computer where the output of the voice-to-speech software is displayed. The overlay can be moved and resized. It also has an “X” in the top right corner to close it. There are some adjustments that you can/should make, I’ll note below. Open a text editor and paste the following code inside it. Then save it as something like “vosk_overlay.py” inside your virtual environment (e.g., ~/.venvs/vosk-overlay/vosk_overlay.py). Here’s the Python code:
#!/usr/bin/env python3
import json, queue, time
import tkinter as tk
import sounddevice as sd
from vosk import Model, KaldiRecognizer

# ===== SETTINGS =====
INPUT_DEVICE = 4  # set this to your mic index; None uses default
MODEL_PATH = "/home/ryan/.venv/vosk-overlay/vosk-models/vosk-model-small-en-us-0.15" # set this to your install path for the vosk models

BLOCK_MS = 50               # lower = snappier; 30–80 is typical
CLEAR_AFTER_S = 5           # clear captions after silence

# Appearance defaults (you can still resize/move interactively)
DEFAULT_W, DEFAULT_H = 1200, 120
DEFAULT_X, DEFAULT_Y = 100, 800
FONT = ("DejaVu Sans", 30)
BG, FG = "black", "white"
ALPHA = 0.88

q = queue.Queue()

def callback(indata, frames, time_info, status):
    if status:
        pass
    q.put(bytes(indata))

def choose_samplerate_and_name():
    dev = INPUT_DEVICE if INPUT_DEVICE is not None else sd.default.device[0]
    info = sd.query_devices(dev, "input")
    return int(info["default_samplerate"]), info["name"]

class Overlay:
    def __init__(self):
        self.running = True
        self.last_update = time.time()
        self.drag_offset = (0, 0)

        # ----- Window -----
        self.root = tk.Tk()
        self.root.title("Live Captions")
        self.root.attributes("-topmost", True)
        try:
            self.root.wm_attributes("-alpha", ALPHA)
        except Exception:
            pass

        # Normal window decorations ON so resizing works naturally.
        # (If you want borderless with a resize grip later, we can do that too.)
        self.root.geometry(f"{DEFAULT_W}x{DEFAULT_H}+{DEFAULT_X}+{DEFAULT_Y}")
        self.root.minsize(400, 80)

        # ----- Top bar (drag + close button) -----
        self.topbar = tk.Frame(self.root, bg=BG, height=28)
        self.topbar.pack(fill="x", side="top")

        self.title_lbl = tk.Label(
            self.topbar, text="Captions", bg=BG, fg=FG, font=("DejaVu Sans", 11)
        )
        self.title_lbl.pack(side="left", padx=8)

        self.close_btn = tk.Button(
            self.topbar,
            text="✕",
            command=self.stop,
            bg=BG,
            fg=FG,
            borderwidth=0,
            font=("DejaVu Sans", 12),
            activebackground=BG,
            activeforeground=FG,
            padx=10
        )
        self.close_btn.pack(side="right")

        # Drag window by the topbar
        for w in (self.topbar, self.title_lbl):
            w.bind("<ButtonPress-1>", self.start_drag)
            w.bind("<B1-Motion>", self.do_drag)

        # ----- Caption area -----
        self.body = tk.Frame(self.root, bg=BG)
        self.body.pack(fill="both", expand=True)

        self.label = tk.Label(
            self.body,
            text="Starting…",
            font=FONT,
            fg=FG,
            bg=BG,
            wraplength=DEFAULT_W - 40,
            justify="center",
        )
        self.label.pack(expand=True, fill="both", padx=12, pady=8)

        # Keyboard shortcut
        self.root.bind("<Escape>", lambda e: self.stop())

        # Update wraplength on resize so text wraps nicely
        self.root.bind("<Configure>", self.on_resize)

        # ----- Audio / Vosk -----
        sr, name = choose_samplerate_and_name()
        self.sr = sr
        self.label.config(text=f"Listening… ({name}, {sr} Hz)")

        self.model = Model(MODEL_PATH)
        self.rec = KaldiRecognizer(self.model, sr)
        self.rec.SetWords(False)

        blocksize = int(sr * (BLOCK_MS / 1000.0))

        self.stream = sd.RawInputStream(
            samplerate=sr,
            blocksize=blocksize,
            dtype="int16",
            channels=1,
            device=INPUT_DEVICE,
            callback=callback,
        )
        self.stream.start()

        # Poll loop
        self.root.after(20, self.poll)
        self.root.mainloop()

    def on_resize(self, event):
        # Keep wrapping close to window width
        w = max(300, event.width - 40)
        self.label.config(wraplength=w)

    def start_drag(self, event):
        self.drag_offset = (event.x_root - self.root.winfo_x(),
                            event.y_root - self.root.winfo_y())

    def do_drag(self, event):
        x = event.x_root - self.drag_offset[0]
        y = event.y_root - self.drag_offset[1]
        self.root.geometry(f"+{x}+{y}")

    def stop(self):
        if not self.running:
            return
        self.running = False
        try:
            self.stream.stop()
            self.stream.close()
        except Exception:
            pass
        try:
            self.root.destroy()
        except Exception:
            pass

    def poll(self):
        if not self.running:
            return

        updated = False

        while not q.empty():
            data = q.get_nowait()
            if self.rec.AcceptWaveform(data):
                result = json.loads(self.rec.Result()).get("text", "").strip()
                if result:
                    self.label.config(text=result)
                    self.last_update = time.time()
                    updated = True
            else:
                partial = json.loads(self.rec.PartialResult()).get("partial", "").strip()
                if partial:
                    self.label.config(text=partial)
                    self.last_update = time.time()
                    updated = True

        if not updated and (time.time() - self.last_update) > CLEAR_AFTER_S:
            self.label.config(text="")

        self.root.after(30, self.poll)

if __name__ == "__main__":
    Overlay()
NOTE: You should modify at least two parts of the script. In the SETTINGS section, I had some issues getting it to pick up my headset microphone, so I ended up manually telling it to use “INPUT_DEVICE = 4”. To use your default microphone, just put “None” instead of “4” and it should pick it up. Right after that, you need to specify where you installed your vosk models. In the script above, it shows where I stored mine. You should adjust that accordingly or the script won’t work.
Once you’ve created the Python script, to run it you just need to do the following at the Konsole:
python ~/.venvs/vosk-overlay/vosk_overlay.pyNOTE: If you’re already inside your virtual environment, you won’t need the directory structure to run this.
Assuming everything worked, you should get an overlay like this:
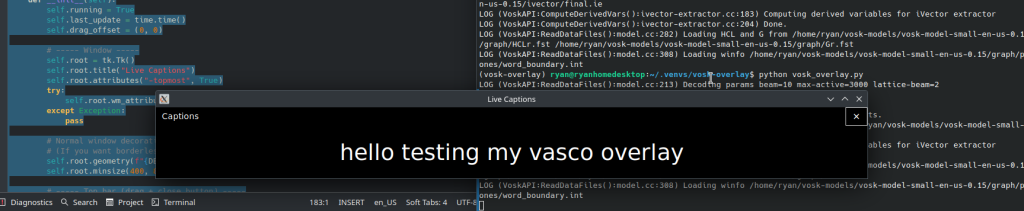
In my very preliminary testing, this works. It has no punctuation, but it is basically real time transcription of what I’m saying. It’s also about 80% accurate, maybe less. I’m guessing a larger, more robust vosk model would work better. I’ll probably play with those to see if they will run in real time on my laptop.
Finally, just because I’m lazy, I wanted a way to launch this from KRunner so I don’t have to open a Konsole at the beginning of class and navigate to the virtual environment to run a script. Here’s what I did…
First, open a Konsole again and make a directory:
mkdir -p ~/.local/share/applications/Now, we’re going to add something to that directory, which will have the OS pick it up as an application. We’ll call it “live-captions.” Here’s what we do:
nano ~/.local/share/applications/live-captions.desktopIn the new screen that opens, paste the following:
Type=Application
Name=Live Captions (Vosk)
Comment=Real-time caption overlay
Exec=bash -lc 'source ~/.venvs/vosk-overlay/bin/activate && python ~/.venvs/vosk-overlay/vosk_overlay.py'
Icon=accessories-text-editor
Terminal=false
Categories=Utility;Accessibility;
Save it by hitting CTRL+X.
Now, you should have a new Application in your Launcher called “Live Captions (Vosk)” and can launch it from KRunner. Launch this at the beginning of class, and you’ll have a live transcription of what you’re saying. No need for PowerPoint, Windows, or Mac. Hooray!
![]()
Leave a Reply