

Several years ago I read a post in a Linux forum talking about splitting up one’s hard drive into multiple partitions so that when the inevitable reformat came along, there was no need to transfer one’s files during the process. Instead, if your files are on one partition while the operating system is on another partition, all you’d need to do is reformat the partition with the operating system. Once you’ve reformatted your operating system partition and booted back into Linux, then getting your files back is as easy as remounting the partition with your files on it.
Over time, my folder with my files, which I sync with Dropbox, has gotten large (too large; I need to clean it out). This means that when I reformat my computer (typically as an upgrade, but sometimes because I mess the OS up), my computer would take days to re-sync with Dropbox, and that just didn’t seem worth it.
So, I decided to try the multiple partition approach to see if that worked any better. I set up the partitions during my reformat. One partition is hosting the operating system (Kubuntu 15.10); another partition is hosting my dropbox files; and a third partition is hosting a different operating system I use (I dual-boot on my computer). I thought I had everything figured out.
However, I ran into a problem with the dropbox partition once I booted into Kubuntu 15.10: I couldn’t get the partition to auto mount before Dropbox started. Since Dropbox was syncing to a partition other than the partition I was using for the operating system, if the partition didn’t auto-mount at startup before Dropbox launched, I’d get an error on startup from Dropbox saying that it couldn’t find the Dropbox folder and that I’d either have to “relink” my account to the folder or start syncing all over again.
I tried creating a line in the “/etc/fstab” file to automount the partition, but I screwed up on my first attempt. The next time I restarted, the computer tried to boot off of that partition instead of off the OS partition, which caused the whole system to hang. I was able to comment out the line I added to fstab and boot back into the OS. I’ve played a lot with the fstab file in order to automount NAS partitions on my computer (see here), but I couldn’t figure out what I needed to add to my “fstab” file in order to get the partition to auto mount correctly.
I eventually found a nice tool that made this process very easy (from this site). It’s a piece of software called “Disks” (package is: “gnome-disk-utility”) that provides a GUI for deciding which partitions you want to mount. Here’s what you need to do:
Step 1) Install “gnome-disk-utility” from Synaptic or the command line.
$ sudo apt-get install gnome-disk-utility

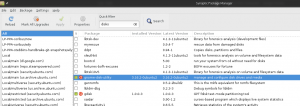
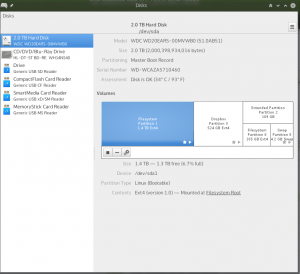
Step 2) Once “Disks” is installed, open the program. You’ll get a nice GUI window that shows all the disks and partitions on your computer, like this:

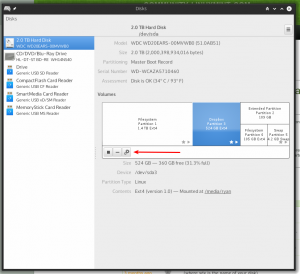
Step 3) Click on the partition you’re trying to auto mount. You’ll then see a set of gears below it.
Step 4) Click on the gears and you’ll get a drop down menu. The item you want is: “Edit Mount Options”:
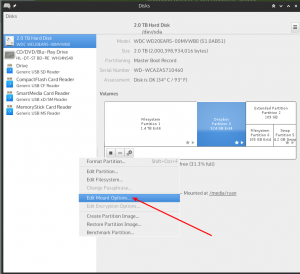
Step 5) That will open a new window:
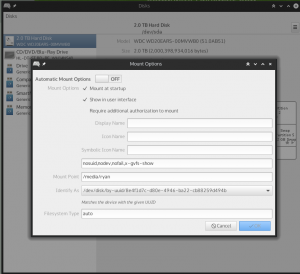
Step 6) In that new window, click on “Mount at startup” (already selected in the screenshot above). You’ll also need to decide on your “Mount Point.” I opted to mount my drive in “/media/ryan,” but you can mount it wherever works best for you. Once you’ve done that, hit “OK” and try restarting your computer. Your partition should now mount automatically on startup, before Dropbox starts.
NOTE: All the GUI does is adds a line to “/etc/fstab,” but it makes sure the line is correct (which is where I got this wrong). The line it added for my partition is:
/dev/disk/by-uuid/8e4f1d7c-d80e-4946-ba22-cb88259d494b /media/ryan auto nosuid,nodev,nofail,x-gvfs-show 0 0
Now that I know what the line has to be in order to automount that partition in the future, I could probably skip using Disks and just add this line, but this did solve my problem. Plus, Disks has lots of options, which makes it a handy piece of software to know about.
![]()
