With a Plex server, I want my collection of movies backed up digitally so I can watch them when and where I want to. This involves a two-step process. First, I have to rip the video from Blu Ray, which I do using MakeMKV. Since that process is pretty straightforward, I’m not going to cover how to do it here. It’s the second step that is more complicated – compressing the video using HandBrake.
I’ve been using HandBrake for years, but have typically just used the default settings. That’s a terrible idea for a number of reasons, which I’ll detail in this post. But the primary reason why I’m posting is to detail how different settings translate into different file sizes so people have a better sense of what settings to use.
Format
The first thing you need to decide when ripping a video using HandBrake is the resulting file format. I’m using HandBrake 1.3.3 which includes three options: MPEG-4, Matroska, and WebM. Each of these formats has advantages and disadvantages.
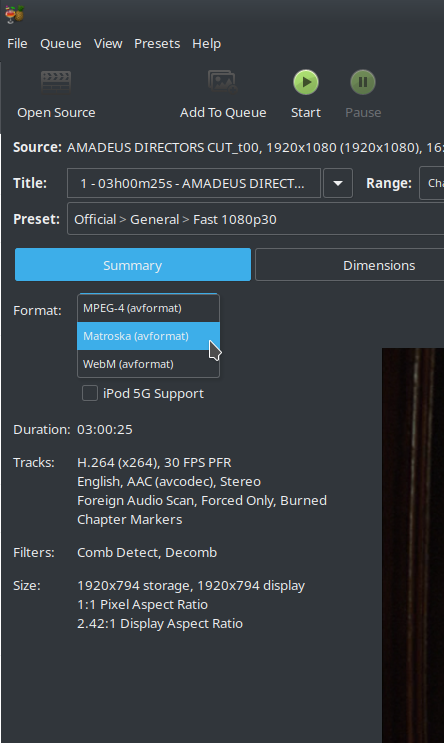
MPEG-4 (or mp4/MP4) is the most widespread format and the most compatible with various devices and programs. This is likely going to be the default for most people. However, MPEG-4 has a major limitation – you cannot store multiple subtitles in the video file itself. If you don’t care about subtitles (e.g., you never watch foreign films), that may not matter to you. But it is a problem for those of us who enjoy a good foreign film. (NOTE: The workaround for most people is to save the subtitles as an .srt file in the same folder, assuming your playback device can then load a separate SRT file.)
Matroska (or MKV) is kind of odd. It’s actually not a video codec. It’s an open-standard container. Basically, it’s like a zip file or folder for the actual media. Inside, it can have video files in a lot of different formats, including MPEG-4, but it can also include subtitle tracks and other media. Thus, the major advantage is that you can store more inside a Matroska file than you can in MPEG-4 files. The disadvantage is that not every device or app supports Matroska files natively. However, support for the format has increased quite a bit. Matroska is now my preferred format, mostly because all of the devices I use for playback can play MKV files and I can store subtitles in the same file.
WebM is actually a variant of Matroska but is meant to be a royalty-free alternative to MP4 that is primarily sponsored by Google and supports Google’s VP8 and VP9 codecs. It is licensed under a BSD license. Basically, MP4 is a proprietary codec while WebM is an open-source one. (NOTE: I don’t have any videos stored in WebM format. However, when I create videos to upload to YouTube, I typically rip them into VP9, which is the preferred format for YouTube.)
Audio
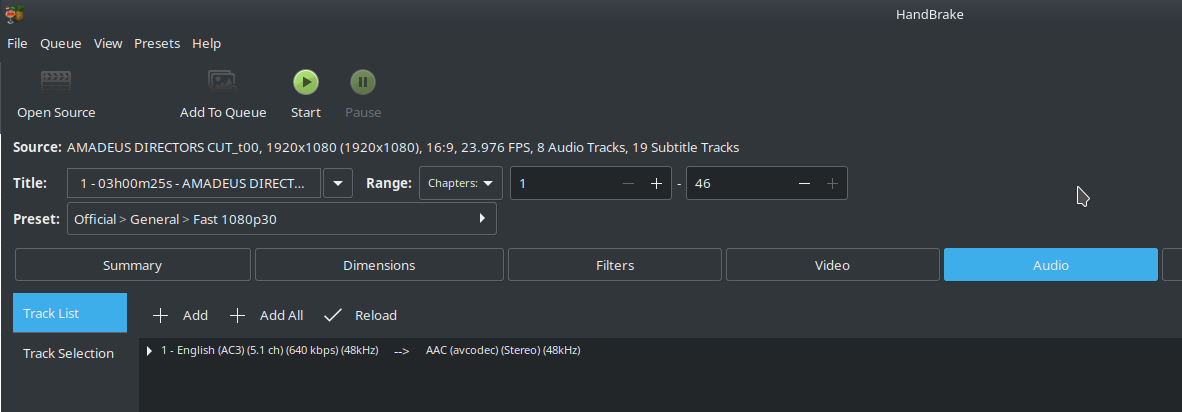
HandBrake searches for the default audio track from the video you are planning on converting but then does something very odd. By default, it sets whatever audio track that is to be converted to stereo audio (i.e., 2.0 or 2 channels – left and right). You can see that in the screenshot below:
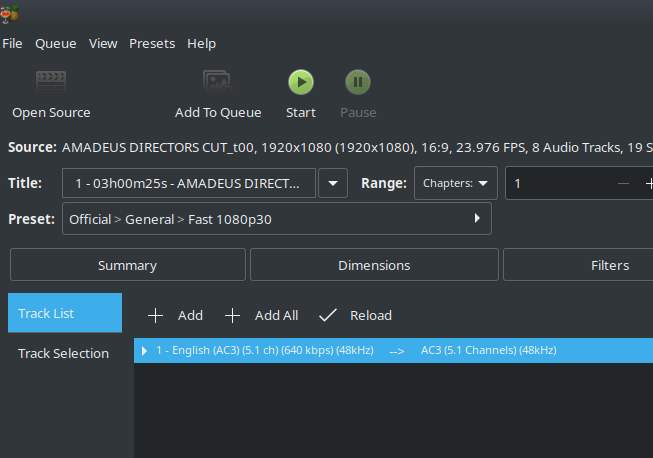
If you have a home theater or good headphones, you’ll want 5.1 surround sound at a minimum. If you have a nicer setup, you’ll want 7.1 surround sound. So, make sure that you delete the default Audio option and instead include a 5.1 surround sound option into your new file. Like this:
(NOTE: I haven’t figured out the best options for 5.1 surround sound. I’m not sure whether AC3 or AC3 passthrough is better. And I’m not sure if Dolby Surround, Dolby ProLogic II, or 5.1 Surround is better. Perhaps someone out there will have insights on this.)
(NOTE: Most modern video players are capable of converting 5.1 surround sound into stereo sound [a.k.a. downsampling]. Not including a 2.0 option is perfectly fine for most people as playback devices will compensate.)
Tags
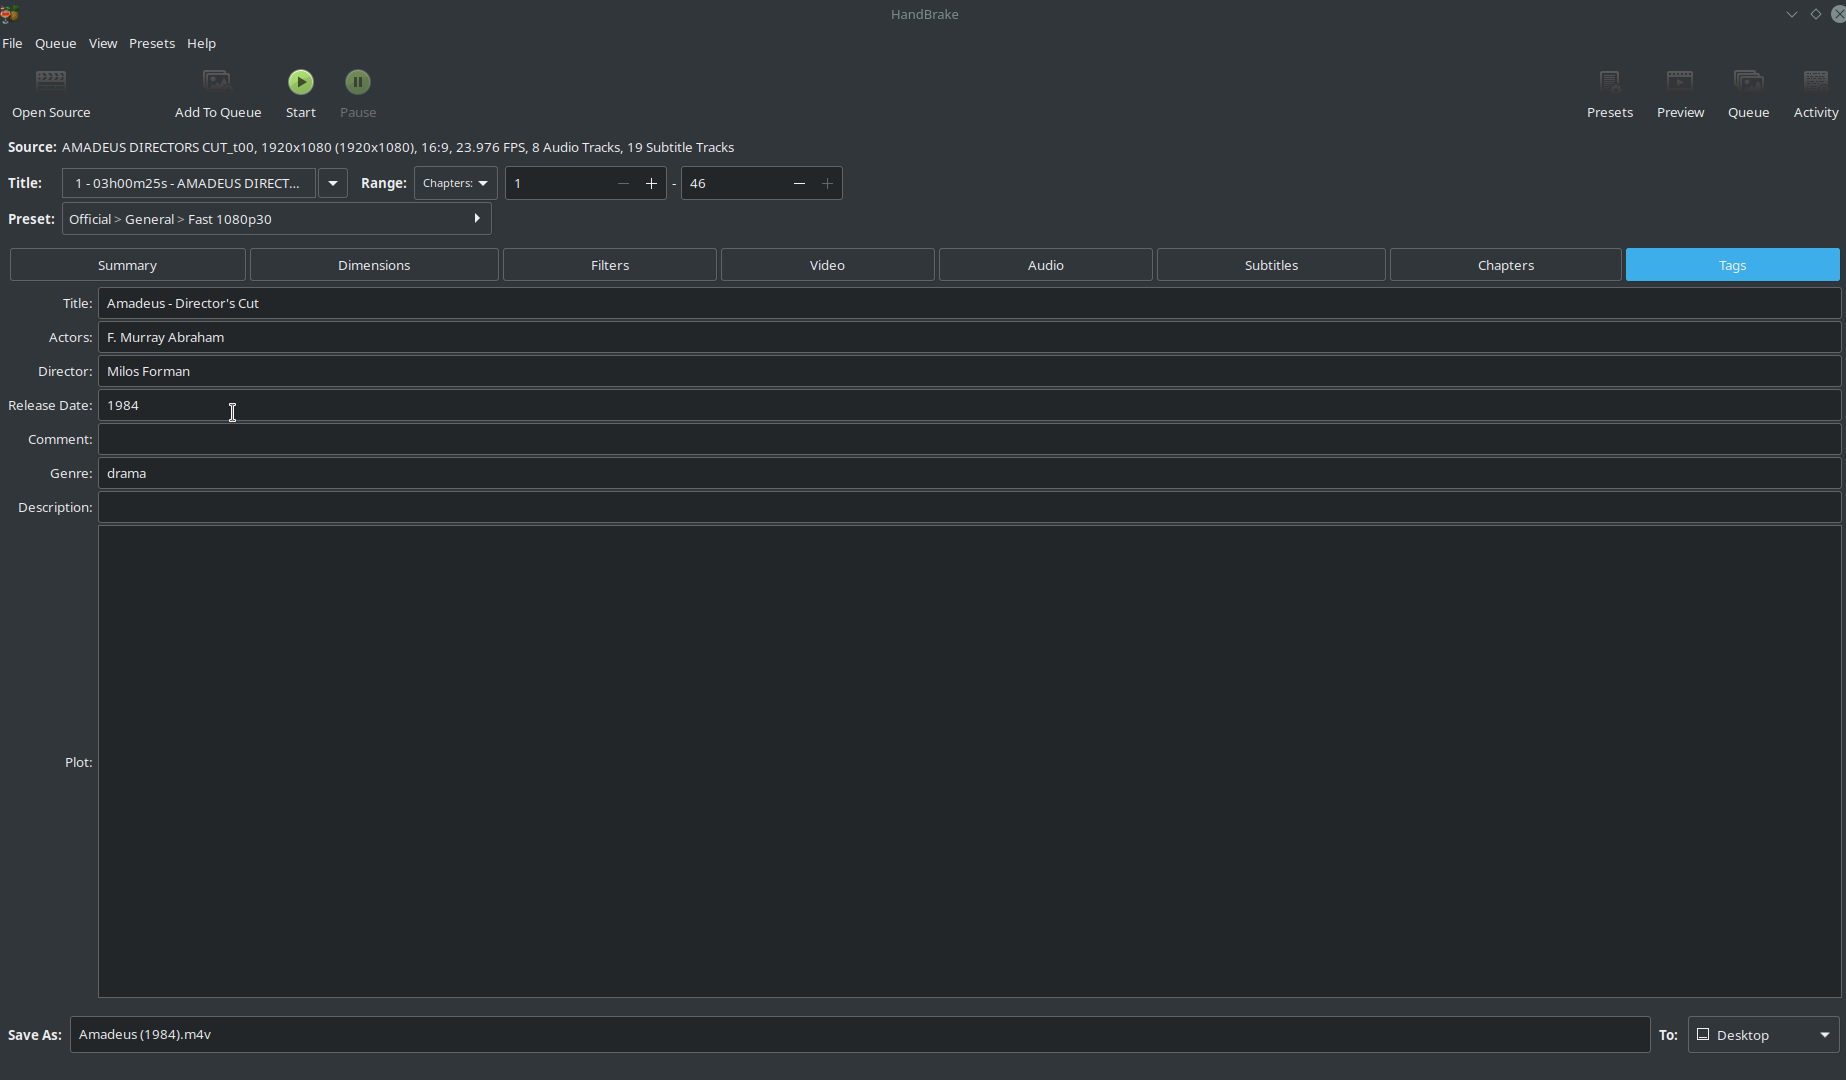
If you haven’t ever used the Tags tab in Handbrake, you really should. By default, the “Title” tag is filled in with whatever information is stored in the video file or DVD you are converting, like this:

However, what you include in the “Title” tag is also what video playback software or devices will think is the name of the video. It is worth taking two minutes to fill in the tags. I typically will change the “Title,” at a minimum, as well as the “Release Date” and “Genre” tags, like this:
Video
Now on to the primary purpose of this post – video quality settings. To determine the ideal balance between quality and file size, I actually converted the same file using different settings. The original file is a rip of the film Amadeus (Director’s Cut) from the Blu-Ray disc that was 28.4 GB in size. The table below illustrates the results of converting the file using different Constant Quality options – all into 1080p video. For each of these conversions, I used identical settings except I changed the Constant Quality option in HandBrake. Each of these used the H.265 (NVenc) encoder with all the other video options on their default settings. Each conversion took about 1 hour (give or take 10 to 15 minutes).
| Setting | Resulting File Size | Compression (% of original file) |
| CQ 22 | 14.3 GB | 50.35% |
| CQ 24 | 8.6 GB | 30.28% |
| CQ 26 | 6.5 GB | 22.89% |
| CQ 28 | 4.9 GB | 17.23% |
| CQ 30 | 3.7 GB | 13.03% |
| CQ 32 | 2.9 GB | 10.21% |
The big question, of course, is how much degradation there is in quality with the smaller file sizes. To illustrate this, I took a screenshot using VLC from four of the video files: the original, unconverted Blu-Ray rip (28.4 GB file), from the CQ 22 rip, the CQ 28 file, and the CQ 32 file. I uploaded the full resolution files below so you can see and compare the differences.
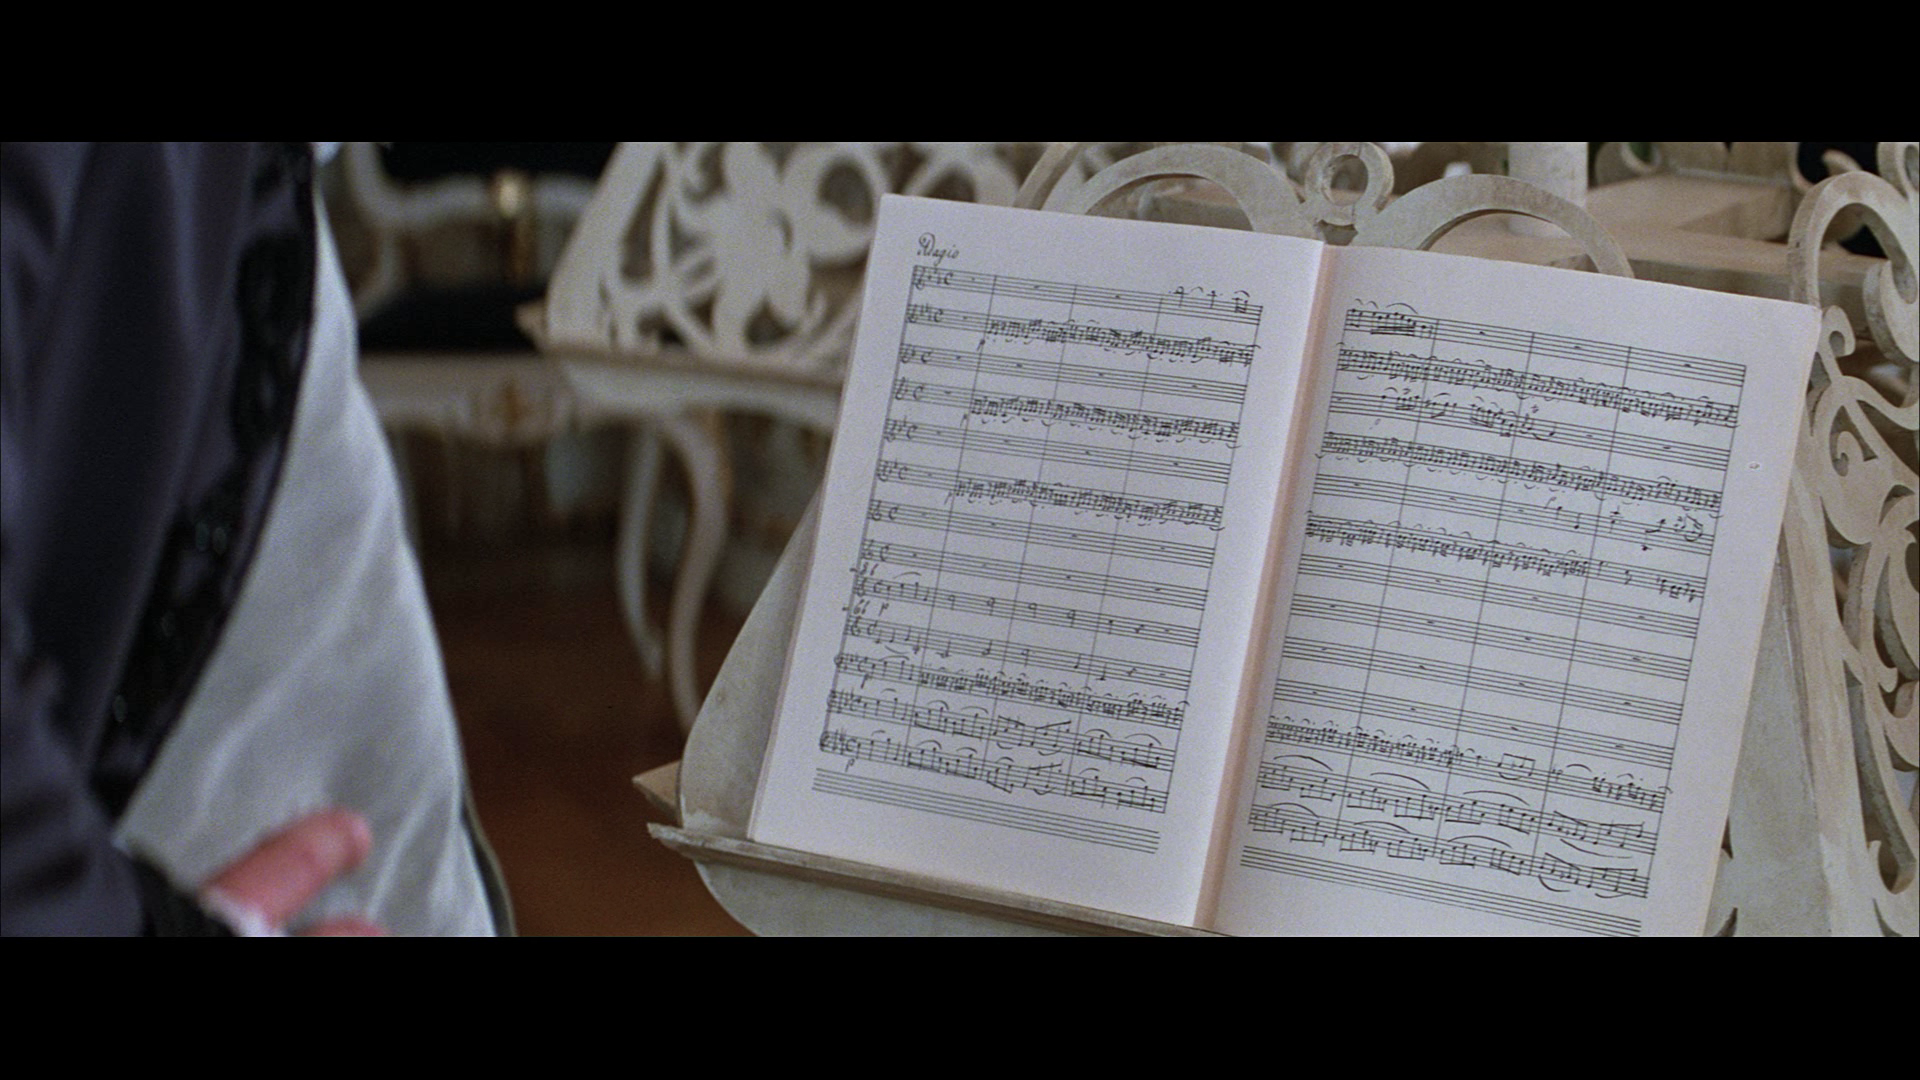


To help my old eyes see the differences, I zoomed in on just one part of these photos to see if I could tell if there were any meaningful differences:
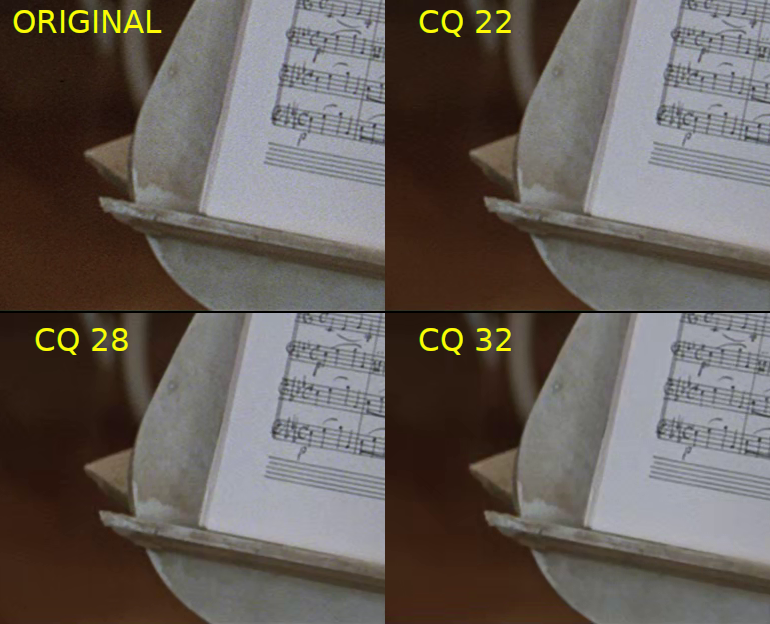
I thought I might see differences in the quality of the screenshots with the musical score (that’s why I chose this frame). I thought the lines might get blurred or the notes would become fuzzier. But that isn’t actually the case. Most of the space savings actually came from the detail in the brown section of this frame. In the original, if you look closely at the bottom left of the image, you can see lots of “noise.” This is basically film grain. The compression algorithm must look for that kind of noise and then remove it. If you look closely at the CQ 22 frame, there is less film grain. In CQ 28, large swathes of the film grain have been removed. And in CQ 32, all of the film grain has been removed and converted to blocks of single colors. Where there is fine detail in the video or distinct color differences, that has been retained. I should probably try this same exercise with a more modern movie shot digitally and not on film to see how the compression varies. Even so, this is a good illustration of how compression algorithms save space – they look for areas that can be considered generally the same color and drop detail that is deemed unimportant.
TL:DR: My recommendation for file sizes and CQ settings…
Scenario 1: Storage space is genuinely not an issue and you have a very fast internet connection, file server, and home network. You should rip your BluRay disks using MakeMKV and leave them as an MKV file with their full size. That will give you the best resolution with lots of options for future conversion if you want.
Scenario 2: You have a fair amount of storage space, a decent internet connection, a reasonably fast/powerful file server, and a good home network, then I’d suggest a dual approach. If it’s a movie you absolutely love and want the ideal combination of quality while minimizing file size, use a CQ of 22 to 26. That will reduce the quality, but retain much of the detail. If it’s just a movie that you enjoyed and think you might want to watch it again in the future but don’t care so much about the quality, go with a lower quality setting (e.g., CQ of 30 or 32).
Scenario 3: You have very little storage space, your internet connection isn’t great, your file server cannot convert files on the fly, and your home network is meh, then you should probably go for higher levels of compression, like CQ 30 or 32. You’ll still get very good quality videos (compression algorithms are very impressive these days) but in a much smaller sized video. Oh, and you should probably convert your files to MP4.
![]()
