

I recently had to move all my websites from one virtual private server (VPS) to another. When I only had a few such websites, I was okay with using SFTP (via Filezilla) to download all of the files and then upload them to the VPS. It took a while but I was okay with that. With about a dozen websites I host on my VPS, that was just not an option. It was time to finally try to figure out how to use tar more effectively on my server.
Why tar? Tar is similar to zip in that it combines lots of files and/or directories into a single file, a tarball or archive, which makes it much easier and way faster to move. Computers can move one large file faster than they can move lots of small files that, combined, make up the same size. When you have to move roughly 8 gigabytes and hundreds of thousands of files, it is far easier to do so by putting all of those files into a single tarball than moving the files individually. That’s why tar is way better for what I was trying to accomplish.
Sidenote: Tar is just a format for packaging all of the files/directories together. Typically, the files are also compressed using something like gzip, leading to a tarball with the extension “tar.gz.” It is possible to just combine the files without compressing them as will be detailed below.
Why was I so reticent to use tar to move my files? Because my prior experience with tar had resulted in several tarbombs, which are a nightmare. Basically, I had unpacked a tarball into the wrong directory, which resulted in thousands of files being in the wrong place, necessitating me having to figure out which files I should keep and which I should get rid of individually. That took more time than I saved by using tar. And since I was doing everything via SSH on a remote VPS, there was no easy way to clean up the mess. Even so, it was time to use tar. So, I bit the bullet and figured out how to do this. This post is my guide on how to carefully use tar but avoid tarbombs, which suck. Note, GNU has an entire manual on tar that goes into much greater detail than my post.
What do all those letters mean?
Since we’re using a console or terminal to package all these files and not a GUI, we have to specify what we want to do with the files using some letters. That’s what the letters do. Not to worry, though – I’m not going to go through all of them. There are literally dozens of options. I’ll keep this simple. The basic structure of the tar command is as follows:
tar [letters to specify what to do] [output tarball] [files or directories to add]I’ll give some specific examples of tar commands below, but, first, let’s cover what the letters we’ll be using mean.
- c – “create”: This tells tar to create an archive, in contrast to modifying a tarball. (Note: This letter alone cannot create an archive.)
- f – “file”: This tells tar to modify files relative to the archive. (Note: Just c and f can work to create a tarball as will be shown below.)
- v – “verbose”: This tells tar to show the progress of the archiving process by showing which files have been added to the archive.
- z – “gzip”: This tells tar to compress the files in the tarball using gzip.
- j – “bzip2”: This tells tar to compress the files in the tarball using bzip2.
- x – “extract”: This tells tar to extract the files in a tarball.
A couple of important notes here regarding the letters. First, the order of the letters does not matter. Second, letters that do the same things should not be included in the command (e.g., “z” and “j” should not both be used).
Basic Examples:
Creating Tarballs
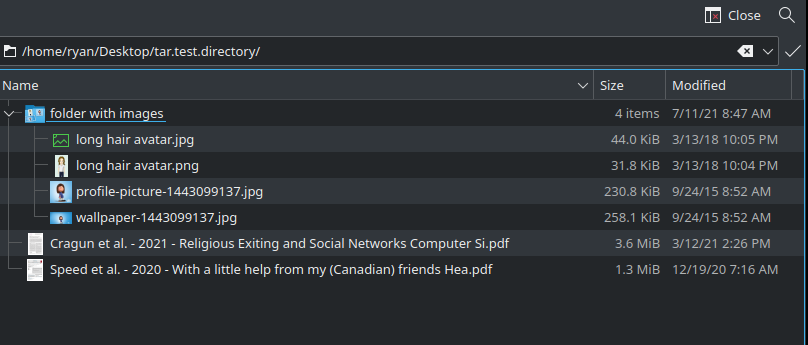
I put a couple of my papers and some images into a folder to use to demonstrate basic uses of tar. Here’s a screenshot so you can see what we’re working with:

First up, I’ll create a tarball of the entire test folder but with no compression and use that to show a couple of important elements of the process. Here’s the code:
cd /home/ryan/Desktop
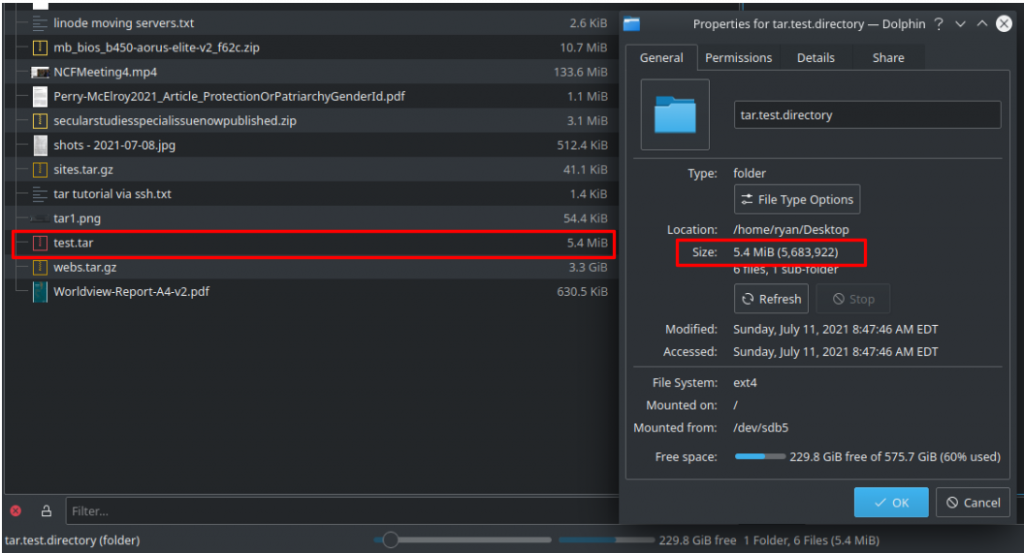
tar cf test.tar tar.test.directory/The code above changes my directory (“cd”) to the parent folder (Desktop). Then it calls the “tar” software and tells it to create an archive called “test.tar” and file inside it (“cf”) the entire test directory “tar.test.directory/”. What this code doesn’t do is compress the files. This can be seen when comparing the size of the folder – 5.4 mb – with the size of the newly created tarball – 5.4 mb.

Quickly, try switching the order of the letters, from “cf” to “fc” and you’ll see that the outcome is the same. Also, if that is all you switch in the code, you’ll notice if you re-run the same command that tar will not warn you that it is going to overwrite the previous tarball, it simply does it.
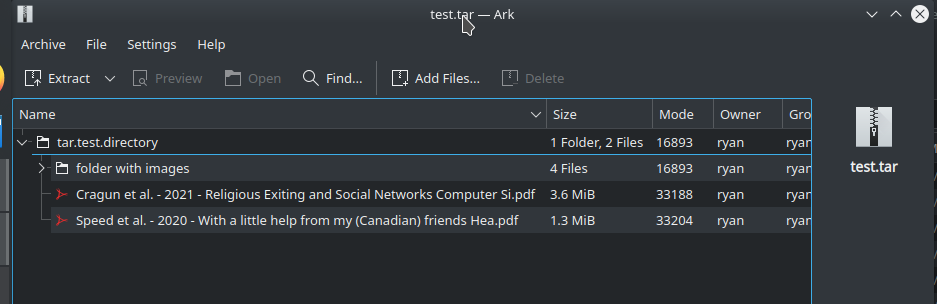
One more item to note that is actually really important, particularly when thinking about extracting an archive, is the folder structure inside the archive. If I open the archive using Ark, you’ll see that, because I navigated to the parent directory in my terminal before creating the tarball, the folder structure inside the archive is from the folder where I created the tarball (in this case, the Desktop directory).

I’m going to create the same tarball but I’m not going to navigate to the parent folder and instead will tell tar which folder to compress and where to store the new tarball:
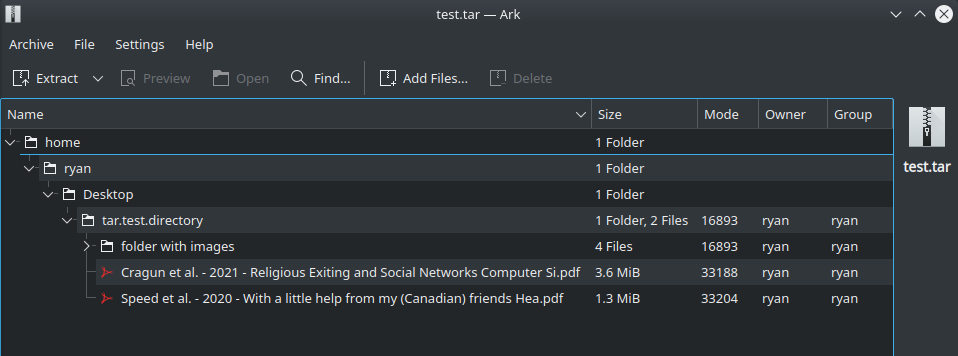
tar cf /home/ryan/Desktop/test.tar /home/ryan/Desktop/tar.test.directory/Functionally, this is the exact same command and archives all the same content. However, look at the directory structure inside the tarball when I open it with Ark:

That tar creates a different directory structure depending on the code you use is important, particularly if you want to avoid tarbombing. Why is this important? When you extract the tarball, the same directory structure that is in the archive will be created. If you don’t know what the directory structure is inside the tarball and extract it, that can result in all sorts of problems, some of which I’ll address at the end of this post.
The lesson here: the folder structure is based on what you enter into the command to create the tarball. So, if you don’t want lots of folders in your tarball, navigate to the folder above it and create it there. Otherwise, you’ll get the same folder structure.
Let’s add two additional letters: “v” for verbose so we can see what is added to the tarball and “z” to compress the files that are being added to the tarball. Here’s the code (remember, the order of the letters doesn’t matter):
tar cfvz test.compressed.tar.gz tar.test.directory/This command calls the tar software, tells it to create (“c”) a tarball and add files (“f”), show the progress (“v”) and compress the files (“z”), saving the resulting tarball as “test.compressed.tar.gz” and the last piece is what should be put into the tarball. Note the modification to the file name to indicate that the tarball has been compressed – “.gz”. This extension is usually a reflection of the compression format. So, if you go with bzip2, it would be “.bz2” instead of “.gz”. Here’s how it looks in the terminal.


The resulting tarball is only 3.4 mb, illustrating that the contents were compressed as they were added to the archive.
Variations on the above command might include replacing the “z” with “j” to compress using bzip2 or “J” to compress using “xz.” Additionally, appending a “p” to the letters will preserve the permissions of the files and directories that are added to the tarball (though that is done by default, so it isn’t necessary to include it).
Modifying a Tarball
After creating a tarball, it’s possible you may need to change the tarball by either adding files to it or deleting files inside it. Here’s how to do each of those.
To add a file to a tarball, use “r” and, of course, “f”, like this:
tar rf test.tar file-to-add.odtThis command calls the tar software and tells it to append (“r”) a file to the archive (the “f” is necessary to tell the software to make changes). The tarball that is modified is next “test.tar.” And what is to be added is last “file-to-add.odt.”
Assuming the tarball you want to add a file to is compressed, files cannot be added. Attempting this will likely give you the error, “tar: Cannot update compressed archives.” Instead, you would need to extract the archive, make whatever changes you want, then create a new compressed tarball.
It is also possible to delete a file from a tarball. This doesn’t involve a letter but a word, “–delete.” The structure of the command is a bit different. Here’s what your code might look like:
tar --delete --file=test.tar file-to-delete.odtThis command calls the tar software and tells it you want to delete a file “–delete.” You then have to tell it which tarball and which file, which is done with the “–file=” option, which specifies the tarball and then the file is added at the end.
If you aren’t sure what files you have in your tarball, you can always list those using the “–list” command:
tar --list --file=test.tarThis is particularly helpful if you are looking for a specific file to remove from a tarball as it will also tell you if the file is in a subfolder inside the archive. If so, you would need to modify the code to take that into account:
tar --delete --file=test.tar "folder1/folder2/folder with space/file-to-delete.odt"Do note that, just like adding files to a compressed tarball, deleting files from a compressed archive isn’t possible.
Extracting a Tarball
Here’s how to extract the files inside a tarball. The basic structure is the same, though, there are some things to consider. First, to extract a tarball, replace the “c” from above when creating it with an “x” which means “extract.” So, with our uncompressed tarball, we would extract it by using the following command:
tar xf test.tarThis will call the tar software, the “x” tells it to “extract” the files (“f”) and “test.tar” is the name of the tarball that is being extracted. Note that this code doesn’t specify where to extract the tarball. That can be added as an option that requires adding “-C”. If it’s left blank, the tarball will be extracted in whichever directory the console/terminal is in. Extracting to a specific directory would like like this:
tar xf test.tar -C /extract/into/this/directoryOf course, if your tarball is compressed and/or you want to see the progress of extracting the tarball, add the corresponding letters. If the tarball is a “tar.gz” you’ll need to add the “z” to decompress the files and “v” to see the progress, like this:
tar xfzv test.tar.gzLastly, keep in mind that the folder structure inside the tarball will be replicated when the files are extracted. What does that mean? If you extract a tarball into a folder called “home” but inside the tarball the files you want to extract are stored inside nested folders like “home/ryan/Desktop/archive”, when you extract the tarball, the files will end up in “home/home/ryan/Desktop/archive.” See below for what to do in such a situation.
Rules for Using tar:
Rule #1: Pay attention to the folder or directory structure when creating and extracting a tarball.
Rule #2: You cannot add or delete files inside a compressed tarball, only in an uncompressed tarball.
Bonus:
Let me give a specific situation that will illustrate this for a Linux server (I may be speaking from experience here). Imagine you just downloaded the latest version of WordPress and want to extract it into the following directory: /var/www/example.com/public/. First, check the directory structure of the tarball. In this case, the fine folks who package WordPress archive the files inside a folder called “wordpress.” As a result, when you extract the tarball, it is going to create a folder inside the “public” folder called “wordpress” when, in fact, you want the files to be directly stored into the folder “public.” That’s a problem. How do you move those files? The Linux move command, “mv” can do it, but it’s kind of tricky how:
mv /var/www/example.com/public/wordpress/* .This tells the OS to move all the files in the wordpress directory (the asterisk “*” does this) up one level (the period “.”). Once you do this, you should then remove the wordpress directory:
rm -R wordpress/ ![]()
