UPDATE: As of Ubuntu 13.04, these directions no longer work. I figured out a way to get this to work, however. See the updated directions at the bottom of this post.
——————Old Directions————————————
If you’d like to share your network attached storage from a Synology file server with your Linuxmint or Ubuntu machine and have it appear as just another folder, you can set the Synology unit to automount on your computer. These steps assume that you have already set up your Synology unit and are sharing at least one folder over the network. It also assumes that you are already connected to the same local network as your Synology unit.
To set up the automount, do the following:
1) Install the package nfs-common, either using synaptic or the command line:
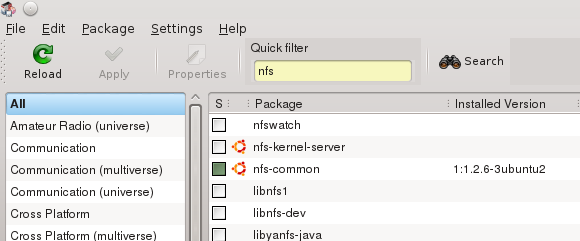
(from the command line: sudo apt-get install nfs-common)
2) Open a console or terminal and type “ifconfig” to find out your IP address on your local network.
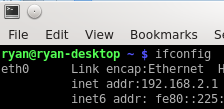
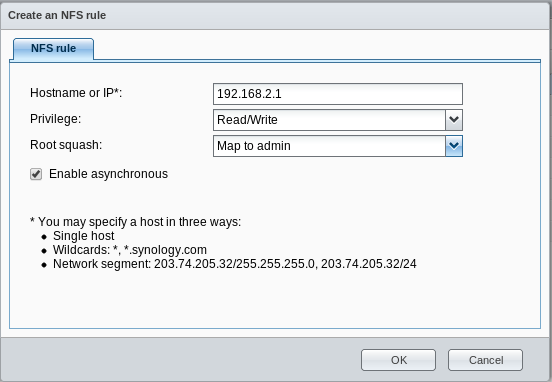
Let’s assume your IP on the local network is 192.168.2.1 (as shown in the figure).
3) Open the Synology interface and then open the Control Panel:
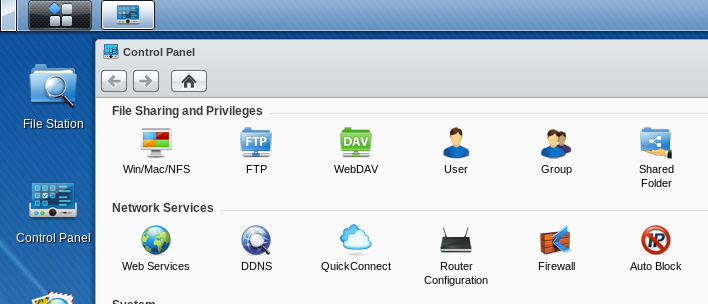
4) Click on “Shared Folder” which will show you a list of your shared folders. Synology comes with the ability to share folders using the nfs protocol. It is a secure protocol that requires you to add the IP address of the computer that is going to be allowed to access files on the Synology NAS. Once you see the shared folders, select the folder you want to share, then click on “Privileges” and then “NFS Privileges”.
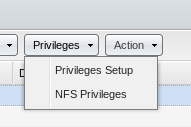
5) In the next window, click on “Create” and then add the IP address of the computer with which you want to share that folder. You should also decide what privileges you want to grant that computer. If you grant it read/write privileges, that computer can modify files. If you grant it the read privilege, that computer can only read files.
6) Once you’ve done that, you should be able to access the shared folder over your network. However, what we want to do is make any shared folders automatically mount over the network every time you start your computer. To do so, you’ll need to do two more things. First, create a folder on your computer to map the shared folder to. An ideal location is in your home folder since you already have read/write privileges there. So, for instance, if you are sharing photos over the network, create a folder in your home directory called “NASphotos” by doing the following from the terminal (or just create it in a file explorer): mkdir /home/user/NASphotos
7) Next, you’ll need to edit your /etc/fstab file. To do so, open a terminal and type: sudo kate /etc/fstab
(You could also use gedit or some other text program, like nano.)
8) This should open the /etc/fstab file in a text editing program. You’ll need to add the following lines to your /etc/fstab file:
Any line that starts with the pound sign “#” is a comment line. I like to add a comment line so I know what my command is doing. Here’s the line I add:
# automount file synology
Next is the line that actually does the work:
192.168.2.100:/volume1/photos /home/user/NASphotos nfs nouser,rsize=8192,wsize=8192,atime,auto,rw,dev,exec,suid 0 0
You’ll need to change the parts that are bolded. The IP is the IP of your Synology unit on the network. If you have a different name for your volume on your Synology unit, you’ll need to change “volume1” to whatever it is. Replace “photos” with the name of the shared folder on your Synology unit. Replace “user” with your username. And replace “NASphotos” with whatever folder you created in step 6.
Save the file and close it.
8) Now, assuming you’ve done everything correctly, type the following into a terminal to mount the shared folder: sudo mount -a
Your shared folder should now show up in your file explorer (e.g. Dolphin) and should do so every time you start your computer. Depending on the privileges you granted yourself on the Synology NAS, you should be able to read and/or write whatever files you’ve stored on the Synology unit as if they were on your own computer.
——————————————New Directions—————————————
UPDATE: As of Ubuntu 13.04, the directions I gave above stopped working. After tinkering with the settings for a while, I found a way to make it work. Follow all of the above steps. However, when you edit the fstab file, try using the following format for each share you want to mount:
192.168.2.100:/volume1/photos /home/user/NASphotos nfs rw,hard,intr,nolock 0 0
This is working for now. This was based on this article on the ubuntu help site.
![]()
Leave a Reply